The Journey of 1000 Miles Begins with One Step

About a year ago, I discovered a thing called hand lettering. Having an interest in calligraphy, I had stumbled upon something that seemed similar. Custom designed and hand drawn pieces consisting of letters and words. An art form that centred around calligraphy and typography, constructed in pencil and ink. I started to notice more about the designs of letters I saw around me, and took an interest in what made something a good or bad design. Soon, I began making my own lettering pieces. I didn’t know much, at that point, and looking back now, I can see how far I have come. At the same time, the further I go, the further I see I have to go. Each new thing learnt opens doors and makes me ask new questions.

The Journey of 1000 Miles Begins with One Step

This is a piece I’ve been planning for a couple of weeks now, but only just got around to creating a final version. Having enjoyed making a few pieces that would suit a poster/T-shirt design, I have been keen to make some more in a similar style. I did experiment with some of the fun sign painting space saving techniques that I used in Standing on the Shoulders of Giants, but in the end the piece was better suited to a more standard layout. However, I did take the chance to combine script letters with Roman capitals, (here the J in Journey, and the S in Step). Keeping the decorative style the same helps the letters look like they belong where they are, and allows their differences to add a bit of flair to the piece without standing out too much.

In other news, Inktober will be drawing to a close soon, and with it my daily drop caps will have their second instalment ready. Today saw V as the latest piece, so you can wait expectantly for next week to see what they all look like, or check out my twitter page to see daily updates of each piece. Recently, I have also been studying Italic calligraphy in an effort to learn more about the origins of script style lettering and the finer (or in this case blunter) points of broad nibbed pens. As such, you may see a bit of a shift towards Italic inspired styles. Up until now, I have preferred to base script pieces off Copperplate, (as you can see with this one), but I think it would be nice to see how some Italic pieces will fare.

Inktober Drop Caps (Part 1)

I recently discovered something called Inktober, which is a challenge to artists to produce one piece of work in ink each day of October. Of course, I already work exclusively in ink, so it suits me well in that regard. The daily part, however, is something I haven’t done since my Thing A Day project, which is very close to being one year ago. Back then, I had only just started lettering, and looking back on the posts, I can see so much I would change and so much that I have learnt. So nearly a year later, I find that I’m back to doing a thing a day, though this time I decided to do an exploration of styles in designing drop caps. Similar to my Days of the Week project, I took this opportunity to challenge myself to making each drop cap as different from the others as possible.

At the same time, I’ve been posting each drop cap as it comes to Twitter and having a little fun composing each tweet to start with the same letter as each day’s drop cap.

Here, I will provide a little insight into what I was aiming for with each drop cap and how it turned out.

Dropcap A

A: My goal was what is essentially a Roman capital with a healthy dose of Gothic inspiration informing it. As much as I love Gothic alphabets, the letter A always seems lacking somehow, so it was fun to inject a little of the style into something a bit more aesthetically pleasing and legible.

Dropcap B

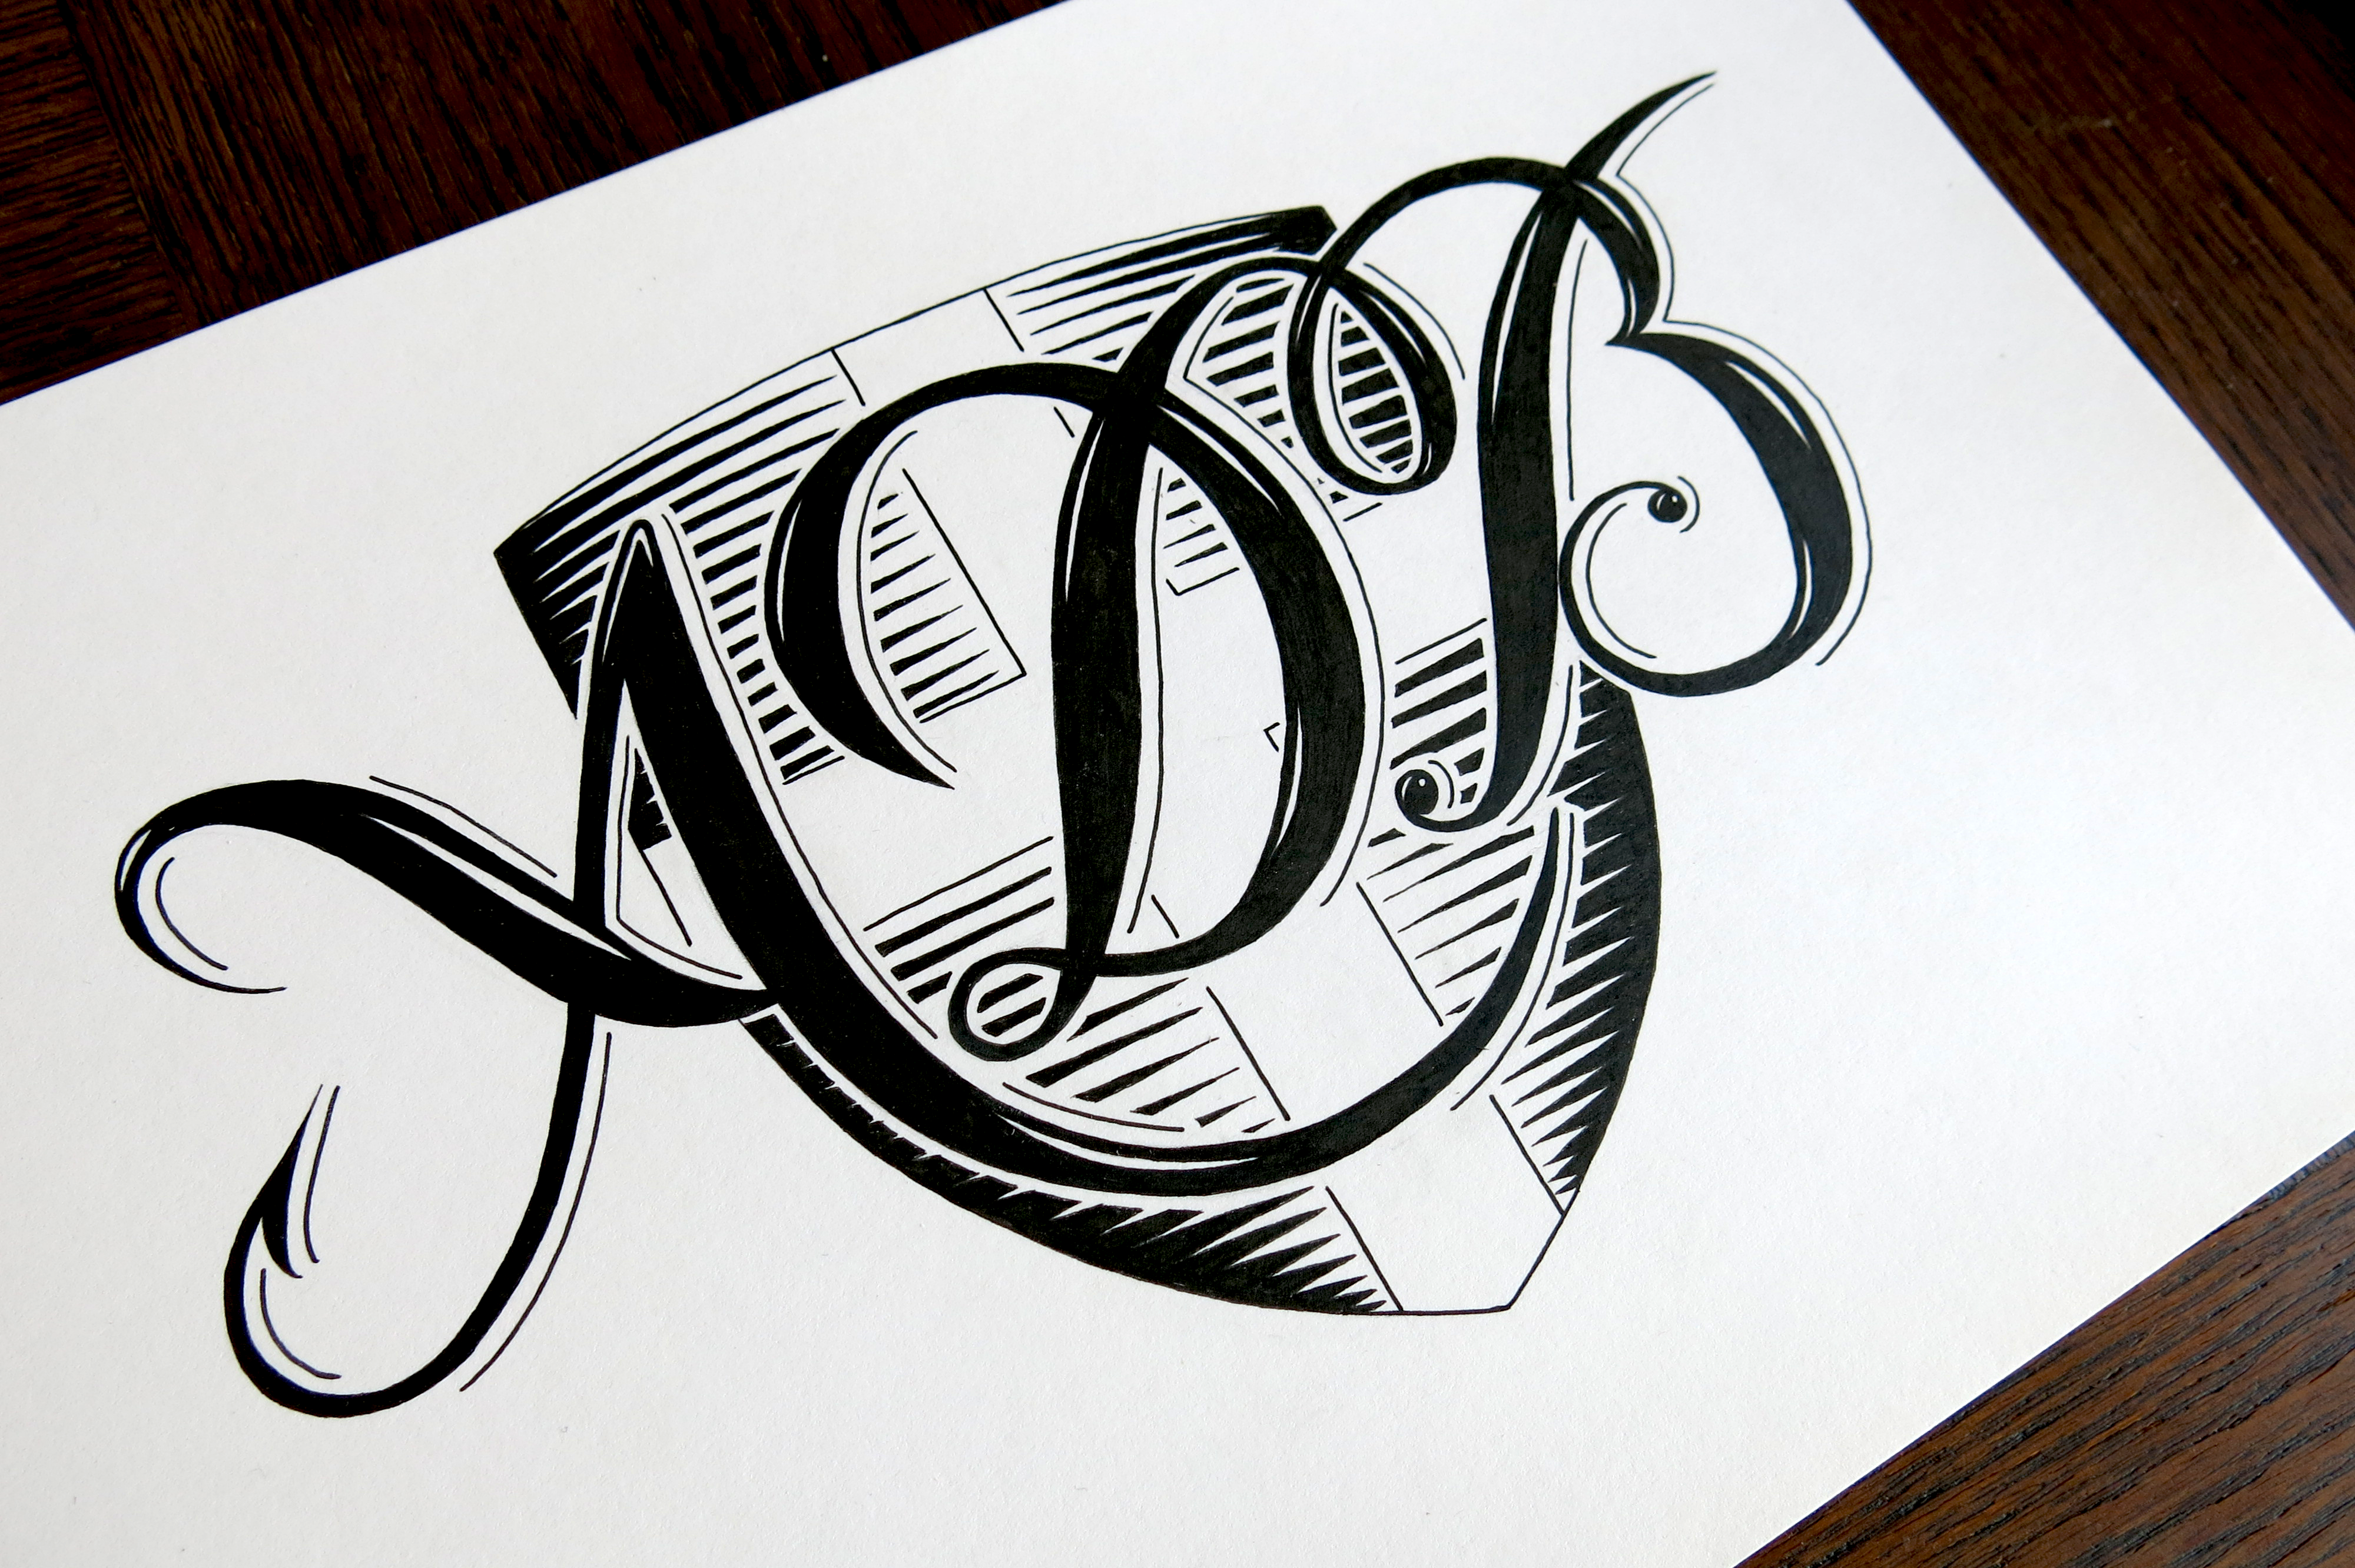
B: I looked to create a letter B that fit well with a Copperplate calligraphy style, but had a unique formation. If you follow the stroke of the pen from the curl at the top right (which would be the starting place in writing it) and trace it all the way through the letter you can see that the lower bowl of the B is created before the upper, which is not the normal way round. To complement the odd formation, the decoration is a little Escher-esque.

Dropcap C

C: Going for a kind of 3D style, which is pretty common in lettering, but the tendency seems to be to use either a shadow or a side-on view of a raised letter. If the two are combined (which they sometimes are) then it seems that the shadow is always comes on the same side as the raised effect. In this case, I experimented with making the light source come from (roughly) the same position as the perspective.

Dropcap D

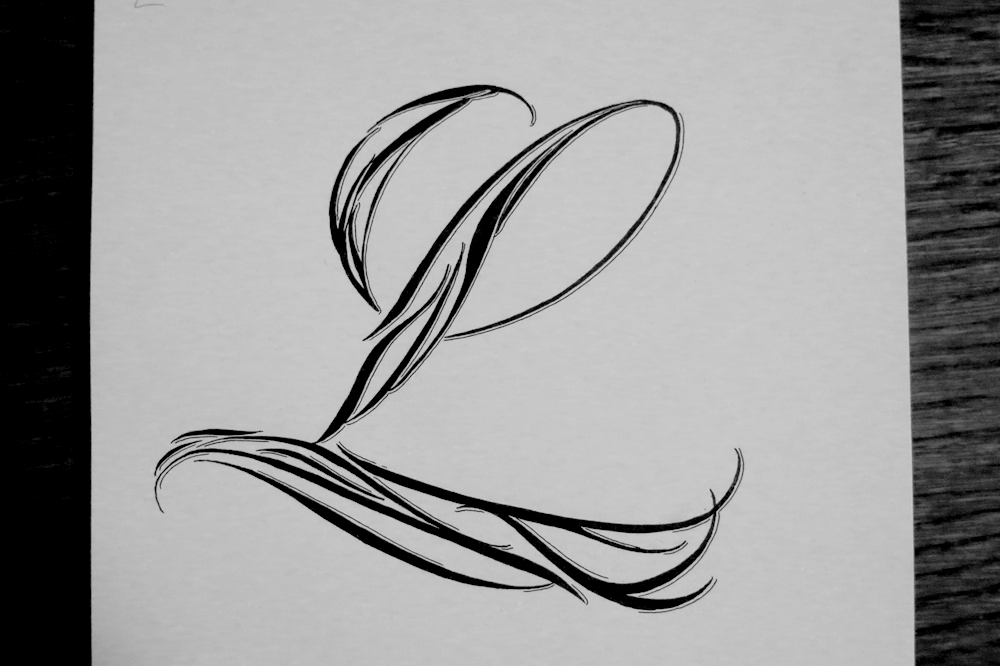
D: A straight up experiment in making things unabashedly swirly. I think that there is a lot more to explore with this style, and I revisit it with the L, later. I think I might experiment further with it in future lettering pieces, too.

Dropcap E

E: This is another example of a raised letter, like the C, but with no shadow. Instead, I endeavoured to make what looks like an inlay made of wood. If it’s hard to see in the small preview, click on the image to get a better look!

Dropcap F

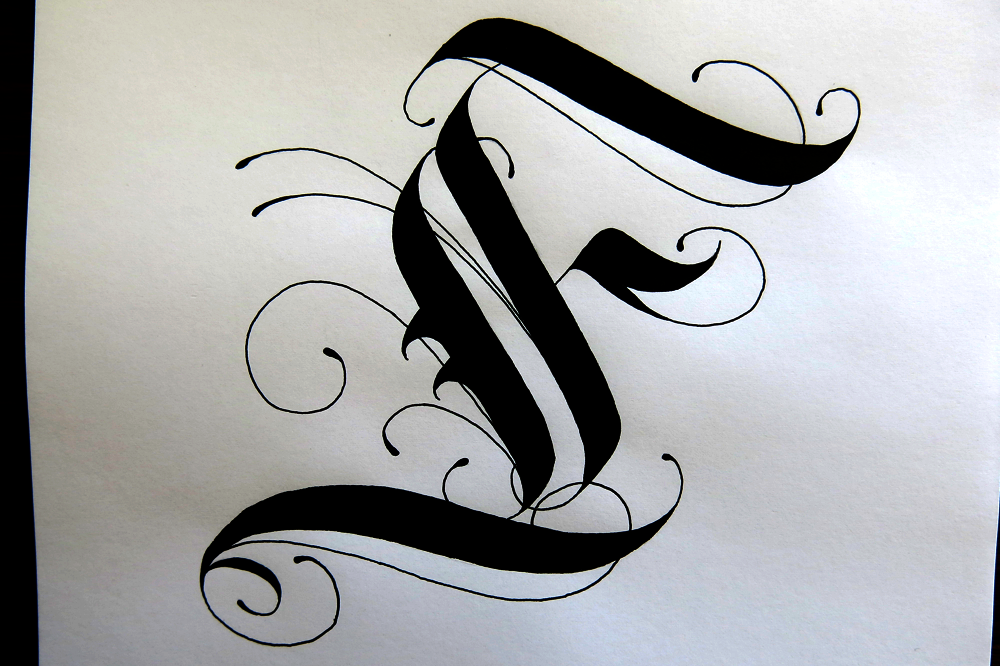
F: The first really Gothic letter I did in the Inktober challenge. The A was an something I wanted to create in a space between traditional styles, but this time, I was aiming for something as more of a calligraffiti-Gothic hybrid.

Dropcap G

G: Sunday is my day off, so I had more time to add more detail and have fun. I was aiming for something ornate and fun, while still adhering to good fundamentals of Roman letter design. It’s important to spend a long time thinking about proportions and form before getting too bogged down in the details.

Dropcap H

H: Bold and strong, inspired by Art Deco power and seeming fascination with trains and forward motion. I used stippling for the first time in what seems like forever to create the effect in the middle.

Dropcap I

I: Similar to the F, this one draws most of its elements from Gothic styles of calligraphy, but its form adheres a little bit more to what we would consider a traditional hand-written capital letter I crossed on the two ends. I think that the little drop shadow outline gives it a nicer effect than what I was going for on the F, so I was pleased with how it turned out.

Dropcap J

J: A bit of an unconventional form with is a combination of a typographic J, which often omits the full curl on the end of the stem, and a hand-written style with a full crossbar on top. The ornamentation is something that I enjoyed doing on a previous lettering piece and wanted to dedicate some time to in one of my drop caps. I did take a lot longer than other letters though!

Dropcap K

K: This one is in a pretty comic-book-like style, which is something that I haven’t explored much before. The form of the letter, the strong drop shadow, and the interior shading come together to make the style, and it ends up standing out as quite different from the other drop caps.

Dropcap L

L: Having enjoyed the D, I decided to create a letter that was made entirely of swirly bits. Before filling in the outline it looked almost as though it was made of feathers, and it does a little still, I suppose.

Dropcap M

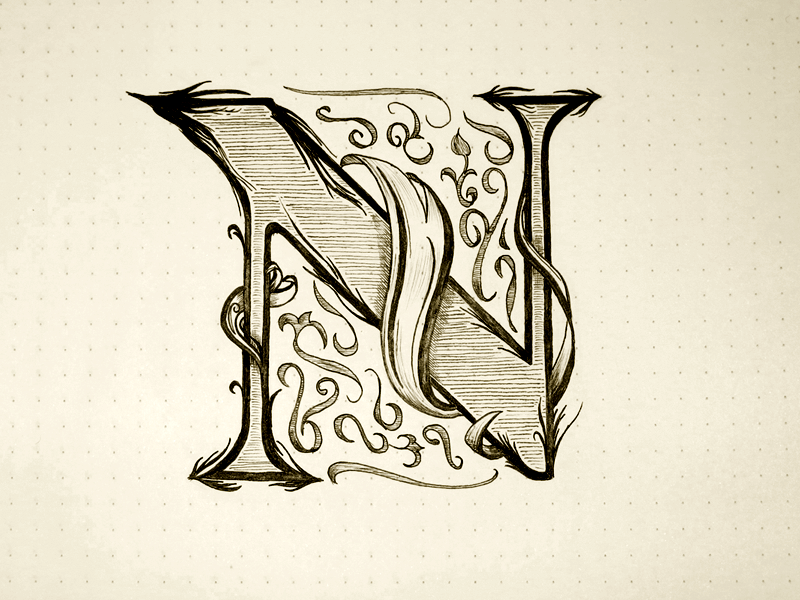
M: This one combines quite a few things I’ve done in past lettering pieces. The decoration on the inlay, the fragmented style and the raised sides are all elements I’ve used before, but not quite in this combination, where they end up creating a unique effect.

The rest of the alphabet will be along in a a couple of weeks or so after I’ve finished the Inktober challenge. In fact, I started a couple of days before Inktober, having decided on a whim to do a drop cap a day, so I will run out of letters a few days before the end of October. I’m planning on doing some number-based lettering pieces, or at the very least some ever popular ampersand practice, and other symbols. Why do designers love ampersands so much anyway? What about the poor @ sign, which never gets much love?

All Will Come Right

Last week, I did a piece that was part of a Churchill quote. This week, I have done the second half! The two pieces are designed to fit in a square shaped layout, and be displayed next to each other. Eventually (perhaps not next week, but at some point) they will be joined by a third piece which will fit beneath them, being twice as wide as it is high, so that the whole ensemble creates a larger square to complete the whole quotation.

All Will Come Right

I’ve inverted it here to give it a nice chalk board style look. It’s visually very similar to the piece last week (of course, that’s the point!) so to create a little contrast, I thought it would be nice to see it in white-on-black. It’s so simple to make it a negative, and it almost feels like cheating, because you end up with something that feels so different. Sometimes I see work done by others and I can’t tell if they’ve done it on black paper with chalk or or some other white medium or whether it’s a simple inversion, so it’s interesting to finally get round to doing so with a piece of my own.

Here are the two pieces in the same photo so you can compare:

Lift Up Your Hearts, All Will Come Right

The goal was to make these pieces resemble each other as much as possible. The obvious choice is to have them structured the same, and to used the same styles. Of course, the similar sentence structure is not only useful as a tool of great rhetoric, but also helps with keeping the two pieces the same. It’s simple enough to see that the styles are the same, and that the banner in the middle is the same shape with the same Tuscan font, but there are also a few other structural similarities that I’ve worked into the pieces to keep them consistent. For instance, the underside of the first line swoops down, then up, in order to match the banner beneath it. Both pieces also have a semicircle in the centre at the top, and have a similar shape at the bottom with the leg of the H/R respectively.

The Truth Shall Make You Free

Since I did the Days of the Week project, I haven’t thought of a new series of pieces to do yet, but I seem have done a few inspirational-ish quotes lately, so I thought I would continue the trend. This one is part of the unofficial motto of the CIA. Doesn’t sound like it would be so inspirational, does it! In fact, the full motto is “And you shall know the truth, and the truth shall make you free” which comes from a bible verse. The official motto is “The Work of a Nation. The Center of Intelligence,” which didn’t seem like it would make a good lettering piece, so I thought I’d go for the unofficial one.

The Truth Shall Make You Free

With this piece, I wanted to achieve something similar to what I was going for with Just Some Words. I’ve seen plenty of pieces around that make no attempt at combinations of styles, but rather focus on the form of the piece, and keep the words all in the same style. I feel like I got closer with this piece than I did with the other one; it’s a style I would like to explore further in the future, so there may see what I can do to make a few pieces thematically linked as a nice little series.

Here’s a little look at the pieces of paper that lead up to the final piece:

The Truth Process

I recently became a mod over at /r/lettering, and seeing the quite frequent posts asking for advice for how to begin, I was thinking that I might post a blog post soon that is aimed towards providing some insight into the process. I usually make some comments about what happened on the way to each piece, but a more general tutorial might be a good place to direct people who are looking for some window to how to go from a blank piece of paper to a finished piece. Above, you can see a little bit of what went into designing this piece from initial sketches to trying out some ligatures for the word “The” to making a full pencil sketch to see how it would look at the right size.

Never give up & never surrender

Here’s a little piece I did just recently. Something motivational which should help to look at any time it seems like it would be easier to stop trying with something. When it comes to finding inspiration, it can be a problem for many people, so this is a nice little mantra. Never give up! Never surrender!

Never give up & never surrender

Surrender to what, though? It’s not exactly a battle, is it? Well, maybe it is, in a way. A battle between the person who wants to get things done and the temptation to give up. One thing that you can say for certain about successful people is that they would say “No” to the question “Did you ever surrender to your doubts?” It can seem daunting when you’re trying your hardest and feeling like you’re getting nowhere. They say “Rome wasn’t built in a day”, which is a neat little cliché. The reason things become clichés, however, is because they’re true. If it weren’t something that resonated with a lot of people, it wouldn’t get said again and again until it was over used. I, on the other hand, am not building Rome, so what am I building? At the moment, it s a portfolio. But it’s also consistency. I’m holding myself to the promise of weekly updates, and though they may end up a few hours late some weeks, I’m not going to let myself fail. I will never give up, and never surrender, even if it seems like it would be easy to do so. You are also not building Rome, unless you are, in which case, well done. But if you’re not, what are you building? What won’t you give up on?

The art of war (a rapidograph experiment)

This week I received some new pens which I hope to use in place of the Unipin and Micron fine liners that I’ve been using up until now. These new pens are Rotring Rapidographs, which are a kind of technical pen. What that means is that I won’t have to go out all the time to buy new fine liners, (though of course they will need ink refills,) and I won’t have to worry about the slow blunting of the tip. These pens have a mechanical tip that never dulls, unlike the felt of the fine liners, so barring them being stamped on, they should be just the same in 20 years!

The greatest victory is that which requires no battle

This piece was my first with these new pens aside from a few test scraps to get used to the different feel. I wanted to do a piece that would test out a few different uses for them, including hatching and filling in large sections. In all, they worked out really well, giving very consistent line thickness. The ink seems to be better than that of the fine liners, too, creating a much better matte surface that doesn’t seem to suffer at all from reflecting camera flashes or other lights, leading to great straight shots.

The piece itself is a quotation from the Art of War by Sun Tzu, which seems to contain a lot of wisdom. Though the quote is about victory and battles, coming from a book about war, it has quite a pacifist sentiment to it, which I found quite interesting. Of the quotes I found, this one suited my needs well. I wanted to continue to explore into the world of Gothic lettering, which is something I haven’t examined as closely as other styles, my main areas of study being Roman and Copperplate calligraphy. In this piece, there is a combination of all three! This being my first real quotation piece in a long time, I also wanted to do something with an interesting visual hierarchy so as to make it the kind of thing you might see on a poster.

Take a look at a few progress shots:

IMG_3594

Sketching out the top half after the space was measured out.

IMG_3599

Pencil version complete.

IMG_3600

Half way through inking.

Auto pilot engaged

Sometimes I have one of those days when I can’t quite get my mind in gear. Wouldn’t it be nice to just have an auto pilot mode? Well when you have a timetable to stick to, sometimes you just have to do it anyway! Searching for inspiration can be tough, so in light of that, I made this piece this week:

I can't brain today. I have the dumb.

I can’t remember when I heard the phrase, but it’s suited the feeling. I decided to make a light hearted, quick piece that wasn’t too complicated. After all, it’s been a pretty hectic week! Last week I did the words of the week challenge on the lettering subreddit. This week, there was a drop cap challenge, so I decided to do a bit of a speed challenge! I tried to focus more on the fluidity of the lines and less on minute, precise details. I often get bogged down in the details of something, so once I zoom in, it’s often hard to zoom out again and look at the piece as a whole. Maybe it’s a trap a lot of perfectionists fall into, or maybe it’s just me, but the solution is to force yourself out of the usual conditions so that you can’t succumb.

Dropcap N

Having some lovely Rhodia dot grid notepaper really helped in diving straight in and not over thinking things. More time that I’m willing to admit usually goes into measuring out the space on the page before I even make a pencil mark for most pieces. Sketching out the design took about half an hour, followed by roughly an hour for inking. That’s much faster than the turn over for a typical piece of mine, so I’d say that the challenge was a success. I’m pleased with the piece, too.

Aside from those two pieces, I also wrapped up a little client project for a tattoo design this week. The brief was to have the word “Ruby” in a similar style as Monday. The dimensions to work with turned out to be perfect for the word. As it was just for a basic design, the client opted to have a slightly less detailed piece than Monday, so you’ll notice a few dissimilarities.

Angled shot small

The next lettering challenge isn’t up yet on the lettering subreddit (where are you mods?) so I don’t know if it’s something I’d like to do next week, but I’m thinking that I might make a thing of doing the drop caps, which come up every fortnight. I think it would make a good series!

Just Some Words

Just some words, just for fun. Another piece inspired by the brush pen style of Copperplate calligraphy that I’ve been doing recently, which has been steadily infiltrating my lettering work.

Just Some Words

I thought, with this piece, that I would keep it as simple as possible. I love to create fine details in all of my pieces, so recently, I’ve been focusing a bit more on simplicity, in order to concentrate more on form. So this piece was going to be filled in with solid black, but when it came down to it, I thought I would add in some of the “shine” elements that I had included on the ornamentation on Monday. I thought that there’s no reason not to, and if I wanted to, I could fill it in after I had finished, so that it was fully black, but I think the effect suits the piece well.

Something else to mention with this piece is that it’s not a combination of typographic or calligraphic styles, which is something I do in most pieces that involve more than one word. The reason for this is that having more than one style in a piece naturally gives it a hierarchy, or at least some contrast in the way you view the words. With this piece, however, I felt that seeing as the word length was so similar, and there being no really strong focal point of the phrase, it would be best to have it all in one style. Aside from anything, the meaning of the phrase is such that it lends itself to something that seems more casual, so it would seem odd to have “Just Some” in a weaker style that “Words”, which would probably be the way it would work out if you wanted to give any of the words more weight. In that case, the word “Words” would seem too important make it seem that it wasn’t, in fact, just some words.